AWS EKS IAM Roles for Service Accounts (IRSA): A Comprehensive Guide
In modern cloud-native architectures, securing Kubernetes workloads is paramount. IRSA (IAM Roles for Service Accounts) on AWS EKS provides a robust solution by enabling Pod-level permissions without sharing static AWS credentials. This guide will walk you through everything—from understanding IRSA to setting up your EKS cluster using both eksctl and CloudFormation, and finally deploying and testing a sample application.
1. Introduction
IAM Roles for Service Accounts (IRSA) revolutionizes permission management in EKS. By assigning each Kubernetes service account its own IAM role, IRSA ensures that Pods receive fine-grained AWS permissions. This eliminates the need for shared credentials or broadly scoped EC2 instance roles.
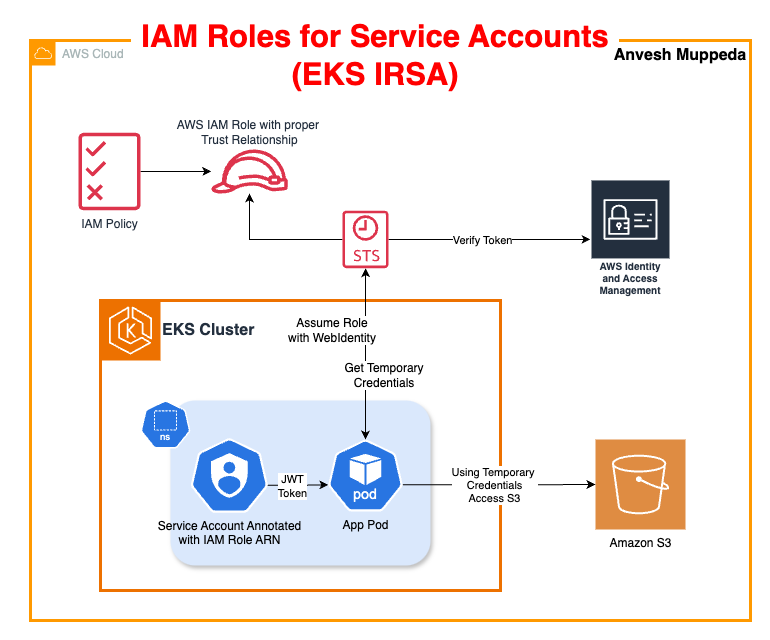
2. What is IRSA?
IRSA leverages AWS’s OpenID Connect (OIDC) provider integration with EKS, allowing Kubernetes service accounts to assume IAM roles. Each service account is bound to an IAM role that defines specific AWS permissions. This ensures that Pods operate with the principle of least privilege, enhancing both security and auditability.
3. Why IRSA?
-
Enhanced Security:
No need for static AWS credentials or overly permissive instance roles. -
Granular Permission Control:
Each Pod gets dedicated, least-privilege access based on its role. -
Improved Auditability:
All API calls made by Pods are traceable in CloudTrail. -
Simplified Management:
Removes the necessity for sidecar tools like kiam or kube2iam.
4. Create an EKS Cluster
Using eksctl
Create your EKS cluster with a configuration file that automatically sets up the OIDC provider—required for IRSA.
cluster.yaml:
apiVersion: eksctl.io/v1alpha5
kind: ClusterConfig
metadata:
  name: eks-irsa-demo
  region: us-west-2
  version: "1.28"
iam:
  withOIDC: true  # Required for IRSA
managedNodeGroups:
  - name: ng-1
    instanceType: t3.medium
    minSize: 2
Run the following command to create your cluster:
eksctl create cluster -f cluster.yaml
Using CloudFormation (CFT)
For an enterprise-ready approach, use IRSA CloudFormation Template to provision your entire environment. The CFT template creates all required AWS resources including:
- EKS Cluster
- OIDC Provider
- IAM Roles with proper trust relationships
Note: If you need to change the namespace or service account for IRSA, update the EKSIAMRoleforServiceAccount logical ID in the template.
  # IRSA: IAM role for Kubernetes service accounts
  EKSIAMRoleforServiceAccount:
    Type: AWS::IAM::Role
    DependsOn: EKSOpenIDConnectProvider
    Properties:
      RoleName: !Sub "EKSIAMRoleforServiceAccount-${AWS::StackName}"
      AssumeRolePolicyDocument: !Sub
        - |
          {
            "Version": "2012-10-17",
            "Statement": [
                {
                    "Effect": "Allow",
                    "Principal": {
                        "Federated": "${OIDCProviderArn}"
                    },
                    "Action": "sts:AssumeRoleWithWebIdentity",
                    "Condition": {
                        "StringEquals": {
                            "${OIDCProvider}:aud": "sts.amazonaws.com",
                            "${OIDCProvider}:sub": "system:serviceaccount:${NameSpace}:${ServiceAccountName}"
                        }
                    }
                }
            ]
          }
        - OIDCProvider: !Select [1, !Split ["//", !GetAtt ControlPlane.OpenIdConnectIssuerUrl]]
          OIDCProviderArn: !GetAtt EKSOpenIDConnectProvider.Arn
          NameSpace: demo-ns
          ServiceAccountName: demo-sa
      ManagedPolicyArns:
          - arn:aws:iam::aws:policy/AmazonS3ReadOnlyAccess
      Description: IAM role for Kubernetes service accounts
Important:
When using CloudFormation, if your cluster is created via CFT then skip Step 5 (Create IAM Role and Service Account) as these resources are already provisioned by the template. The manual creation is optional in this case.
5. 🛠️ IRSA Implementation
You can implement IRSA using either the convenience of eksctl or manually with AWS CLI.
Using eksctl
Deploy IRSA for your service account with a single command:
eksctl create iamserviceaccount \
  --name demo-sa \
  --namespace demo-ns \
  --cluster irsa-demo-cluster #Replace with your cluster name \
  --role-name IRSA-S3-Reader-Role \
  --attach-policy-arn arn:aws:iam::aws:policy/AmazonS3ReadOnlyAccess \
  --approve
Manual Implementation Using AWS CLI
Run below commands to populate the required variables:
export AWS_REGION="us-east-1"
account_id=$(aws sts get-caller-identity --query "Account" --output text)
oidc_provider=$(aws eks describe-cluster --name my-cluster --region $AWS_REGION --query "cluster.identity.oidc.issuer" --output text | sed -e "s/^https:\/\///")
export namespace=demo-ns
export service_account=demo-sa
-
Create Trust Policy:
Create atrust-relationship.jsonfile using your account ID and OIDC provider URL (above variables will do that).cat >trust-relationship.json <<EOF
{
"Version": "2012-10-17",
"Statement": [
{
"Effect": "Allow",
"Principal": {
"Federated": "arn:aws:iam::$account_id:oidc-provider/$oidc_provider"
},
"Action": "sts:AssumeRoleWithWebIdentity",
"Condition": {
"StringEquals": {
"$oidc_provider:aud": "sts.amazonaws.com",
"$oidc_provider:sub": "system:serviceaccount:$namespace:$service_account"
}
}
}
]
}
EOF -
Create IAM Role:
aws iam create-role \
  --role-name IRSA-S3-Reader-Role \
--assume-role-policy-document file://trust-relationship.json -
Attach Policy:
aws iam attach-role-policy \
  --role-name IRSA-S3-Reader-Role \
  --policy-arn arn:aws:iam::aws:policy/AmazonS3ReadOnlyAccess
6. Create Namespace & Service Account and Annotate with IAM Role
-
Create a Namespace:
kubectl create namespace demo-ns -
Create the Service Account with Annotation:
cat <<EOF | kubectl apply -f -
apiVersion: v1
kind: ServiceAccount
metadata:
  name: demo-sa
  namespace: demo-ns
EOF -
Annotate your service account with the Amazon Resource Name (ARN) of the IAM role that you want the service account to assume
kubectl annotate serviceaccount -n $namespace $service_account eks.amazonaws.com/role-arn=arn:aws:iam::$account_id:role/my-roleex:
kubectl annotate serviceaccount -n demo-ns demo-sa eks.amazonaws.com/role-arn=arn:aws:iam::1234567890:role/my-role -
Verify the Annotation:
> k describe sa demo-sa -n demo-ns
 Name:                demo-sa
 Namespace:           demo-ns
 Labels:              <none>
 Annotations:         eks.amazonaws.com/role-arn: arn:aws:iam::975050084277:role/EKSIAMRoleforServiceAccount-irsa-cluster-stack
 Image pull secrets:  <none>
 Mountable secrets:   <none>
 Tokens:              <none>
 Events:              <none>
7. Deploy a Simple AWS CLI App and Test
Deploy the Test Pod
Deploy a pod running the AWS CLI to test the IRSA configuration:
cat <<EOF | kubectl apply -f -
apiVersion: v1
kind: Pod
metadata:
  name: s3-access-test
  namespace: demo-ns
spec:
  serviceAccountName: demo-sa
  containers:
    - name: aws-cli
      image: amazon/aws-cli:latest
      command: ["/bin/sh", "-c"]
      args: ["sleep 3600"]
EOF
Test the IRSA Configuration
-
Enter the Pod:
kubectl exec -it s3-access-test -n demo-ns -- /bin/sh -
Inside the Pod, Run:
-
Verify IAM Role:
   sh-4.2# aws sts get-caller-identity
   {
   "UserId": "AROA6GBMDR62RO6NME5EQ:botocore-session-1743984333",
   "Account": "975050084277",
   "Arn": "arn:aws:sts::975050084277:assumed-role/EKSIAMRoleforServiceAccount-irsa-cluster-stack/botocore-session-1743984333"
   }
sh-4.2# -
List S3 Buckets (should succeed):
   sh-4.2# aws s3 ls
   2025-04-06 16:59:17 cf-templates-bo1tkidmyuqb-us-east-1
   2025-04-06 22:00:56 my-test-bucket-1743976854
sh-4.2# -
Try Creating an S3 Bucket (should fail due to read-only permissions):
   sh-4.2# aws s3 mb s3://test-bucket-$(date +%s)
   make_bucket failed: s3://test-bucket-1743984371 An error occurred (AccessDenied) when calling the CreateBucket operation: User: arn:aws:sts::975050084277:assumed-role/EKSIAMRoleforServiceAccount-irsa-cluster-stack/botocore-session-1743984333 is not authorized to perform: s3:CreateBucket on resource: "arn:aws:s3:::test-bucket-1743984371" because no identity-based policy allows the s3:CreateBucket action
   sh-4.2#
-
8. Troubleshooting
-
AccessDenied Errors:
Check that the IAM policy is correctly attached and that the trust policy matches the service account (system:serviceaccount:<namespace>:<sa-name>). -
InvalidIdentityToken Issues:
Ensure the OIDC provider URL in your IAM trust policy exactly matches the one from your EKS cluster. -
Role Not Being Assumed:
Verify the service account’s annotation (eks.amazonaws.com/role-arn) and confirm that the namespace and service account names are correct. -
OIDC Provider Verification:
Confirm that the OIDC provider is registered in the IAM console under Identity Providers.
9. Conclusion
IRSA fundamentally transforms AWS EKS security by enabling Pod-specific IAM roles. In this guide, we covered:
- Introduction: Overview of IRSA and its benefits.
- What is IRSA: How IRSA works to secure Kubernetes workloads.
- Why IRSA: The security, auditability, and management advantages.
- Creating an EKS Cluster: Methods using both
eksctland CloudFormation (with CFT provisioning all required resources). - IRSA Implementation: Options using
eksctland manual AWS CLI commands. - Namespace & Service Account Creation: Setting up and annotating the service account.
- Deploying & Testing: Running a sample AWS CLI application.
- Troubleshooting: Addressing common issues.
- Conclusion: Final recap and best practices.
Final Note:
If you opt for the CloudFormation deployment, skip the manual creation of the IAM Role and Service Account—they’re automatically provisioned by the template.
Happy deploying!