AWS Load Balancer Controller on EKS: A Comprehensive Guide
Credits
Author: Rohini Gundala
You can reach me through the following platforms:
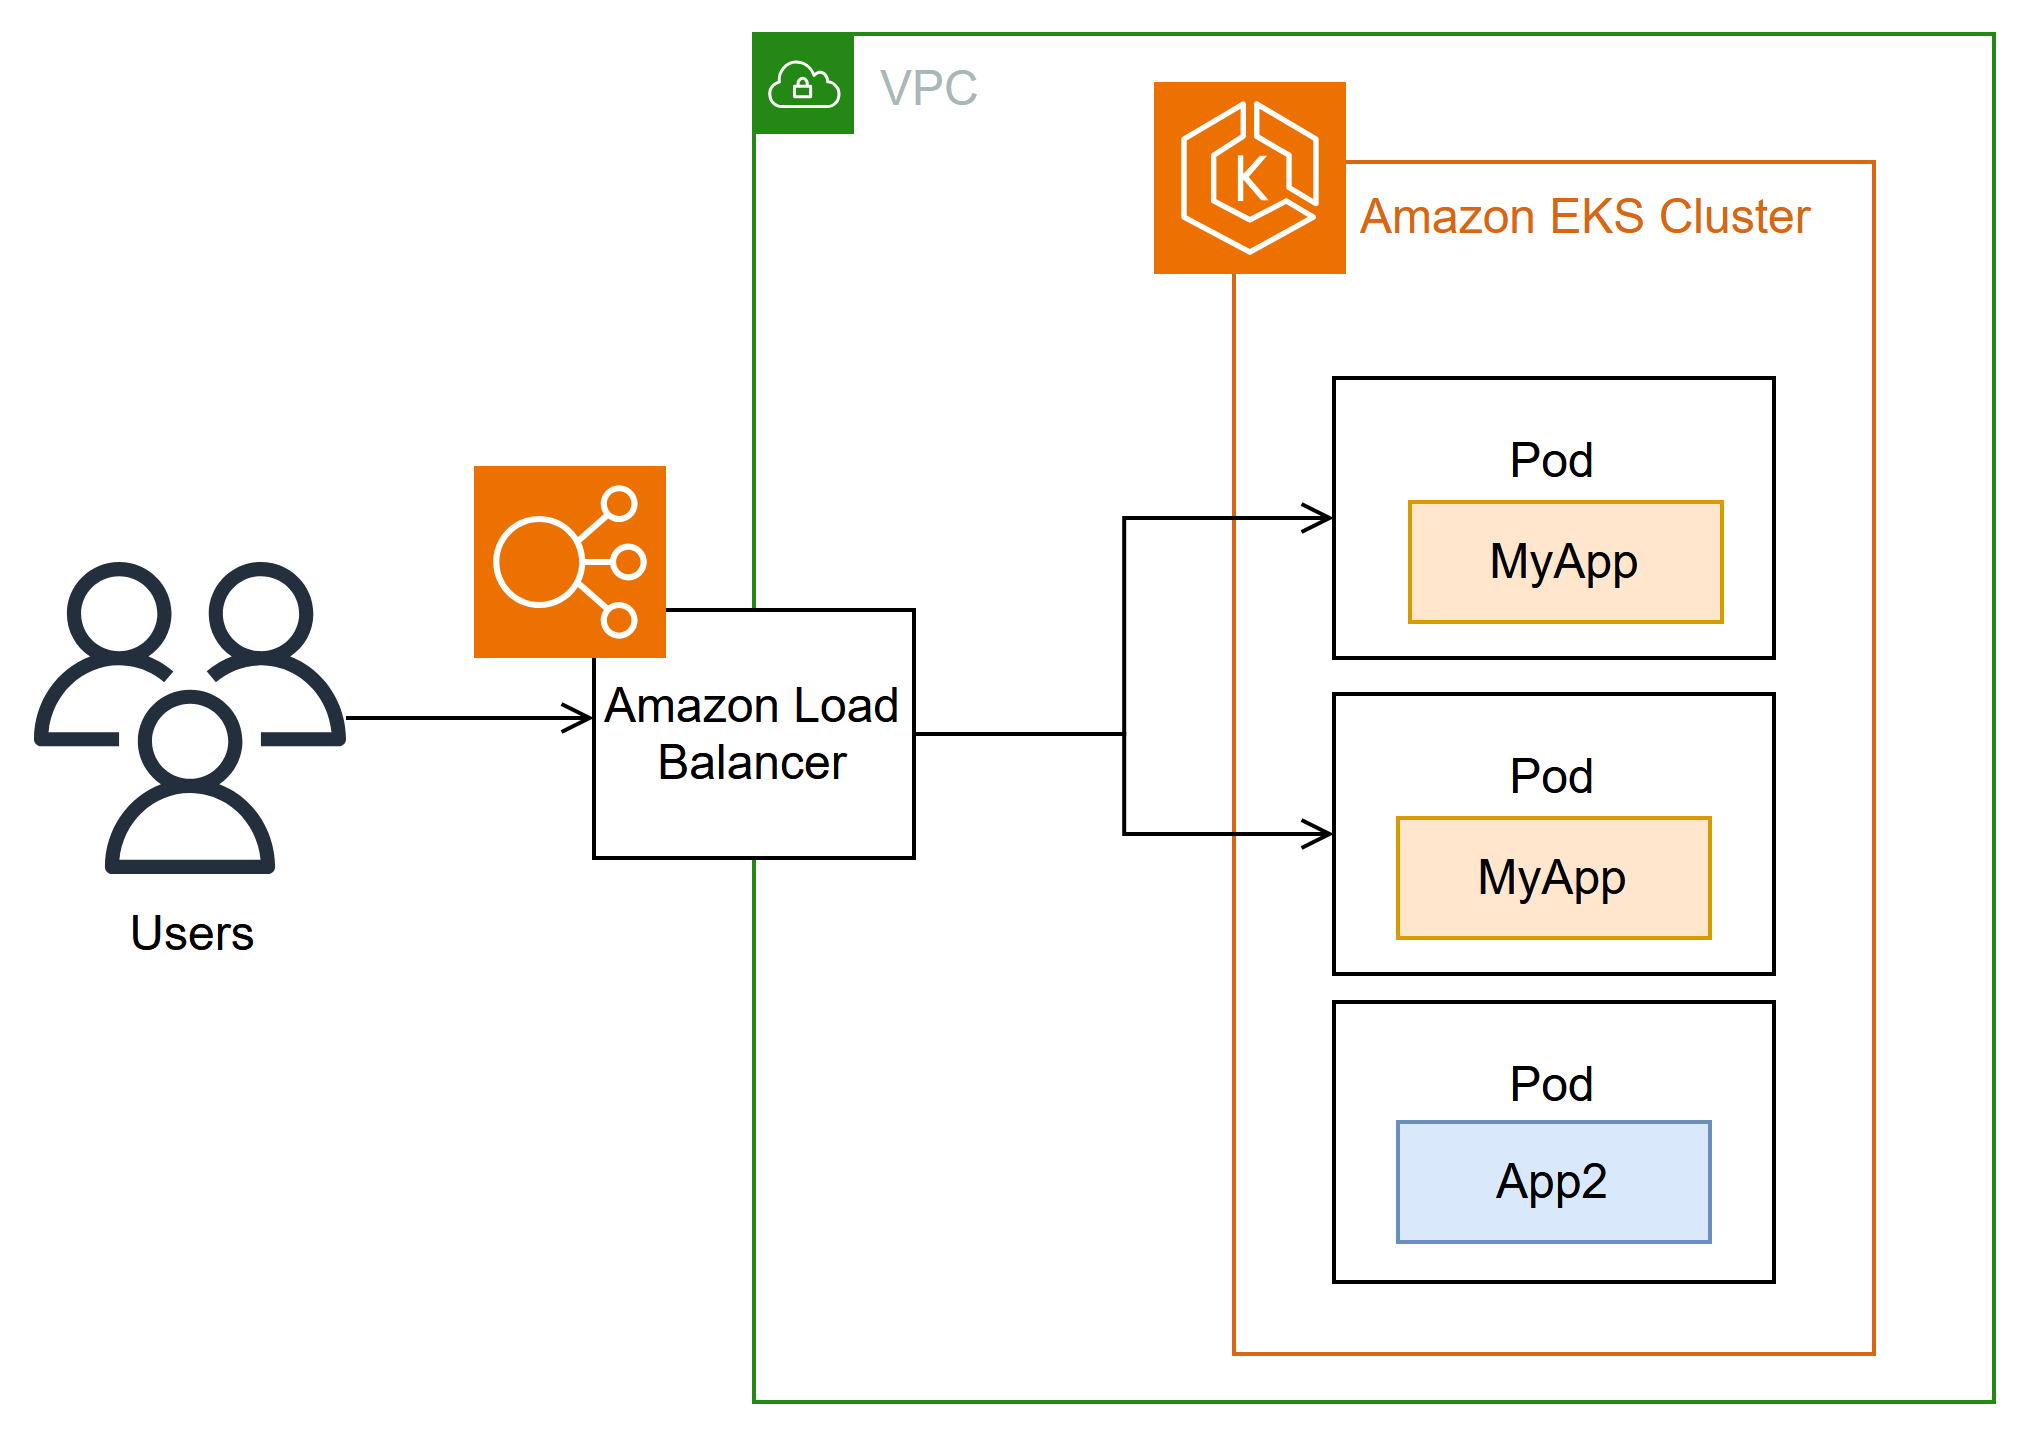
In this guide, we will walk through the steps to install the AWS Load Balancer Controller on an Amazon EKS (Elastic Kubernetes Service) cluster. This controller allows you to manage AWS Elastic Load Balancers (ELBs) for your Kubernetes services.
The AWS Load Balancer Controller is a Kubernetes controller that automatically manages AWS Elastic Load Balancers (ELBs) for Kubernetes Ingresses and Services.
It supports:
Application Load Balancer (ALB) Network Load Balancer (NLB)
How ALB Controller Works (Simplified)
You define an Ingress or a Service of type LoadBalancer in your Kubernetes manifest. The AWS Load Balancer Controller watches for those resources. It automatically creates and configures an ALB/NLB in your AWS account. It keeps the AWS resources in sync with changes in your cluster.
Prerequisites
Before starting the installation, ensure that you have the following prerequisites:
AWS CLI and KUBECTL installed and configured.
An EKS-cluster already created.
IAM OIDC provider enabled for the EKS cluster.
Helm installed on your local machine.
Step: Create EKS Cluster using eksctl
By using the Below Command, we are creating EKS cluster without node group Information.
eksctl create cluster --name=my-ALB-eks-cluster --region=us-east-1 --without-nodegroup
Step: Create node group for EKS Cluster
In this step, we will create node group Information as below
eksctl create nodegroup \
  --cluster=my-eks-ALB-cluster \
  --region=us-east-1 \
  --name=Alb-eks-nodegroup \
  --node-type=t3.medium \
  --nodes=1 \
  --nodes-min=1 \
  --nodes-max=2 \
  --ssh-access \
  --ssh-public-key=test-eks-alb
Step: Connect to your EKS Cluster
Use the below mentioned command to connect to your EKS Cluser using Command Line Interface
aws eks --region us-east-1 update-kubeconfig --name my-eks-ALB-cluster
Step: Associate OIDC Provider (if not done)
This command connects your EKS cluster to an OpenID Connect (OIDC) provider, which is required for securely allowing AWS resources to interact with your Kubernetes services.
curl -o iam-policy.json https://raw.githubusercontent.com/kubernetes-sigs/aws-load-balancer-controller/main/docs/install/iam_policy.json
Step:Create IAM Policy
Create an IAM policy in AWS using the downloaded iam-policy.json file. This policy allows the Load Balancer Controller to access required AWS resources.
aws iam create-policy --policy-name AWSLoadBalancerControllerIAMPolicy --policy-document file://iam-policy.json
Step: Create Service Account for Load Balancer Controller
Creates a Kubernetes service account in the kube-system namespace for the Load Balancer Controller, associating it with the IAM policy you just created. This allows the controller to interact with AWS resources securely.
eksctl create iamserviceaccount \
     --cluster my-eks-ALB-cluster \
     --namespace kube-system \
     --name aws-load-balancer-controller \
     --role-name AmazonEKSLoadBalancerControllerRole \
     --attach-policy-arn arn:aws:iam::##########:policy/AWSLoadBalancerControllerIAMPolicy \
     --approve \
     --override-existing-serviceaccounts
From the Above Command placeholder ########## must be replaced with your actual AWS account ID.
Step :Helm Installation
Adds the AWS EKS Helm chart repository and updates it to ensure you have the latest charts available.
helm repo add eks https://aws.github.io/eks-charts
helm repo update
Step :Install the AWS Load Balancer Controller using Helm
This installs the AWS Load Balancer Controller in your EKS cluster using Helm. It specifies the cluster name, uses the service account you created, and sets the region and VPC ID. It also sets the ingress class to ALB, which means the Load Balancer Controller will use AWS Application Load Balancers.
helm upgrade --install aws-load-balancer-controller eks/aws-load-balancer-controller \
     -n kube-system \
     --set clusterName=my-eks-ALB-cluster \
     --set serviceAccount.create=false \
     --set serviceAccount.name=aws-load-balancer-controller \
     --set region=us-east-1 \
     --set vpcId=vpc-########## \
     --set ingressClass=alb
Step :Deploy Applications to Test Application LoadBalancer Controller
deployed three simple applications on your Kubernetes cluster using Deployment resources. These are standard workloads that run containerized applications, in your case:
App1: Nginx server App2: Apache HTTPD server App3: A simple echo service Each of these applications is exposed using a Service of type ClusterIP
Create an yaml file with name Test-App.yaml in the namespace alb-test as below
apiVersion: apps/v1
kind: Deployment
metadata:
  name: app1
  namespace: alb-test
spec:
  replicas: 1
  selector:
    matchLabels:
      app: app1
  template:
    metadata:
      labels:
        app: app1
    spec:
      containers:
        - name: app1
          image: nginx
          ports:
            - containerPort: 80
---
apiVersion: v1
kind: Service
metadata:
  name: app1
  namespace: alb-test
spec:
  selector:
    app: app1
  ports:
    - port: 80
---
apiVersion: apps/v1
kind: Deployment
metadata:
  name: app2
  namespace: alb-test
spec:
  replicas: 1
  selector:
    matchLabels:
      app: app2
  template:
    metadata:
      labels:
        app: app2
    spec:
      containers:
        - name: app2
          image: httpd
          ports:
            - containerPort: 80
---
apiVersion: v1
kind: Service
metadata:
  name: app2
  namespace: alb-test
spec:
  selector:
    app: app2
  ports:
    - port: 80
---
apiVersion: apps/v1
kind: Deployment
metadata:
  name: app3
  namespace: alb-test
spec:
  replicas: 1
  selector:
    matchLabels:
      app: app3
  template:
    metadata:
      labels:
        app: app3
    spec:
      containers:
        - name: app3
          image: hashicorp/http-echo
          args:
            - "-text=Hello from app3"
          ports:
            - containerPort: 5678
---
apiVersion: v1
kind: Service
metadata:
  name: app3
  namespace: alb-test
spec:
  selector:
    app: app3
  ports:
    - port: 80
      targetPort: 5678
Apply the Yaml by using
Kubectl apply -f Test-App.yaml
Below is the output
deployment.apps/app1 created
service/app1 created
deployment.apps/app2 created
service/app2 created
deployment.apps/app3 created
service/app3 created
After Deploying the Above Deployment yaml, Now we will proceed to deploy the Ingress Resource as below
apiVersion: networking.k8s.io/v1
kind: Ingress
metadata:
  name: app-routing
  namespace: alb-test
  annotations:
    alb.ingress.kubernetes.io/scheme: internet-facing
    alb.ingress.kubernetes.io/target-type: ip
    alb.ingress.kubernetes.io/listen-ports: '[{"HTTP": 80}]'
    alb.ingress.kubernetes.io/group.name: multi-app-group
spec:
  ingressClassName: alb
  rules:
    - host: app1.kubecluster.xyz
      http:
        paths:
          - path: /
            pathType: Prefix
            backend:
              service:
                name: app1
                port:
                  number: 80
          - path: /api
            pathType: Prefix
            backend:
              service:
                name: app2
                port:
                  number: 80
    - host: app2.kubecluster.xyz
      http:
        paths:
          - path: /
            pathType: Prefix
            backend:
              service:
                name: app3
                port:
                  number: 80
Apply the Ingress-resource.yaml in the alb-test namespace. Now we can verify in the AWS that an Application Load Balancer(ALB) has been created in the Backend. We can now access the Applications created by using The DNS Name app1.kubecluster.xyz,app1.kubecluster.xyz/api,app2.kubecluster.xyz
Step: Create an Application In different Namespace with Load Balancer Service type
The below Yaml CTest-App2.yaml reates an namespace called Dev and deploys the Nginx using Load Balancer Type service.
apiVersion: v1
kind: Namespace
metadata:
  name: dev
---
apiVersion: apps/v1
kind: Deployment
metadata:
  name: nginx-deployment
  namespace: dev
spec:
  replicas: 2
  selector:
    matchLabels:
      app: nginx
  template:
    metadata:
      labels:
        app: nginx
    spec:
      containers:
      - name: nginx
        image: nginx:latest
        ports:
        - containerPort: 80
---
apiVersion: v1
kind: Service
metadata:
  name: nginx-service
  namespace: dev
spec:
  selector:
    app: nginx
  ports:
  - port: 80
    targetPort: 80
  type: LoadBalancer
As per the Load Balancer controller if we use service type as Load Balancer, Network Load Balancer will create.
ANNOTATION
service.beta.kubernetes.io/aws-load-balancer-type: "alb"
when you install the AWS Load Balancer Controller, it can automatically create either an Application Load Balancer (ALB) or Network Load Balancer (NLB) based on the type of resource you’re using: typically, ALB for Ingress and NLB for Service of type LoadBalancer.
This annotation is explicitly specifying the type of AWS Load Balancer to be created — in this case, ALB — even though you’re using a Service of type Load Balancer, which by default would normally result in an NLB being created.
Create a yaml File with Test-App3.yaml
apiVersion: apps/v1
kind: Deployment
metadata:
  name: nginx-deployment
spec:
  replicas: 2
  selector:
    matchLabels:
      app: nginx
  template:
    metadata:
      labels:
        app: nginx
    spec:
      containers:
        - name: nginx
          image: nginx
          ports:
            - containerPort: 80
---
apiVersion: v1
kind: Service
metadata:
  name: nginx-service
  annotations:
    service.beta.kubernetes.io/aws-load-balancer-type: "nlb"
spec:
  type: LoadBalancer
  selector:
    app: nginx
  ports:
    - protocol: TCP
      port: 80
      targetPort: 80
Default Behavior Without Annotation:
If you create a Service of type Load Balancer without this annotation, here’s what usually happens: Default behavior (in AWS): it creates a Network Load Balancer (NLB). This is because the classic Kubernetes AWS cloud provider only supports NLB for Service of type Load Balancer.
When the Annotation Is Useful:
The AWS Load Balancer Controller extends this functionality. With the annotation, you override the default and instruct the controller to provision an ALB instead — even though it’s a Service, not an Ingress.
This is particularly useful if you want ALB features like: Path-based routing, Host-based routing, Web Application Firewall (WAF) support, SSL termination