EKS Storage with Amazon EFS (Elastic File System): Complete Implementation Guide
Store Kubernetes volumes with Amazon EFS
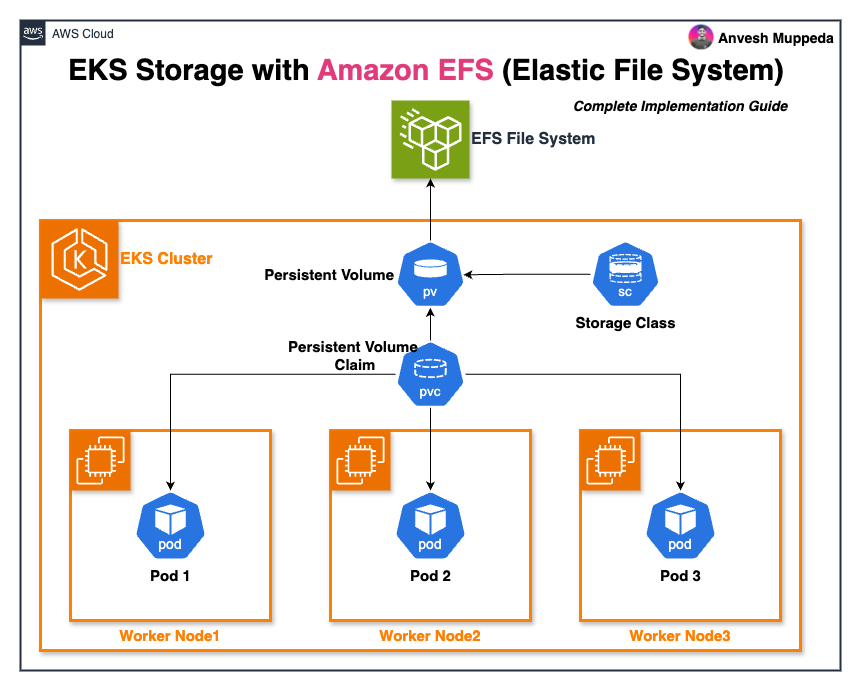
Amazon Elastic File System (EFS) transforms how we handle persistent storage in Kubernetes environments by providing serverless, fully elastic file storage that scales automatically. This comprehensive guide walks you through implementing EFS storage in your Amazon EKS clusters using the EFS Container Storage Interface (CSI) driver.
Use the manifest templates to create your own Kubernetes resources which can be used in the examples below.
Use the Cloud Formation templates to create your own AWS resources which can be used in the examples below.
Table of Contents
- Understanding Amazon EFS for Kubernetes
- Prerequisites and Setup
- Implementation Patterns
- Real-World Examples
- Advanced Configurations
- Best Practices
- Troubleshooting
Understanding Amazon EFS for Kubernetes
What is Amazon EFS?
Amazon EFS provides Network File System (NFS) that can be mounted across multiple EC2 instances simultaneously. Unlike EBS volumes that attach to single instances, EFS supports the ReadWriteMany access mode, making it perfect for applications requiring shared storage across multiple pods.
Key Benefits for EKS
- Serverless: No capacity planning or storage management required
- Elastic: Automatically scales from gigabytes to petabytes
- Multi-AZ: Built-in high availability across Availability Zones
- Concurrent Access: Multiple pods can read and write simultaneously
- POSIX Compliant: Full file system semantics
Important Considerations
Compatibility Limitations:
- Windows-based container images are not supported
- Dynamic provisioning unavailable for Fargate nodes (static provisioning works)
- Not compatible with EKS Hybrid Nodes
Version Requirements:
- Dynamic provisioning requires driver version 1.2+
- ARM64 support requires version 1.3.2+
- FIPS mounting support requires version 1.4.2+
Resource Quotas:
- Maximum 1000 access points per EFS file system
- Plan capacity based on your application needs
Prerequisites and Setup
Provisioning EKS Cluster with EFS Setup
To simplify the setup process, you can use the provided CloudFormation template ./cloudformation/eks-efs-setup.yaml. This template provisions an EKS cluster with the necessary EFS configuration, including:
- EFS CSI driver add-on installation
- IAM permissions for the EFS CSI driver
- Pod identity association for secure access
Steps to Deploy:
- Navigate to the directory containing the CloudFormation template:
cd ./cloudformation
- Deploy the CloudFormation stack:
aws cloudformation deploy \
   --template-file eks-efs-setup.yaml \
   --stack-name eks-efs-setup \
   --capabilities CAPABILITY_NAMED_IAM
- Verify the EKS cluster and EFS setup:
aws eks list-clusters
aws efs describe-file-systems
This approach automates the provisioning process, ensuring all required components are configured correctly.
If you prefer manual setup, follow the steps below to install the EFS CSI driver and configure IAM permissions.
1. Environment Preparation
First, ensure you have the required tools installed:
# Verify AWS CLI version (requires 2.12.3+ or 1.27.160+)
aws --version

# Check kubectl compatibility
kubectl version --client

# Verify EKS cluster access
kubectl get nodes
2. EFS CSI Driver Installation
Check if the EFS CSI driver add-on is available for your cluster version:
# List available add-on versions
aws eks describe-addon-versions --addon-name aws-efs-csi-driver --query 'addons[0].addonVersions[0:3]'

# Install the add-on (replace with your cluster name)
aws eks create-addon \
    --cluster-name your-cluster-name \
    --addon-name aws-efs-csi-driver \
    --addon-version v2.1.8-eksbuild.1
3. IAM Configuration
The EFS CSI driver requires specific IAM permissions. Choose one of these approaches:
Option A: Pod Identity (Recommended for New Clusters)
# Set environment variables
export CLUSTER_NAME=your-cluster-name
export ROLE_NAME=AmazonEKS_EFS_CSI_DriverRole

# Create pod identity association
eksctl create podidentityassociation \
    --service-account-name efs-csi-controller-sa \
    --namespace kube-system \
    --cluster $CLUSTER_NAME \
    --role-name $ROLE_NAME \
    --permission-policy-arns arn:aws:iam::aws:policy/service-role/AmazonEFSCSIDriverPolicy \
    --approve
Option B: IAM Roles for Service Accounts (IRSA)
# Create OIDC provider if not exists
eksctl utils associate-iam-oidc-provider \
    --region us-west-2 \
    --cluster $CLUSTER_NAME \
    --approve

# Create service account with IAM role
eksctl create iamserviceaccount \
    --name efs-csi-controller-sa \
    --namespace kube-system \
    --cluster $CLUSTER_NAME \
    --attach-policy-arn arn:aws:iam::aws:policy/service-role/AmazonEFSCSIDriverPolicy \
    --approve
4. Verify Installation
# Check CSI driver pods
kubectl get pods -n kube-system -l app=efs-csi-controller

# Verify service account configuration
kubectl describe sa efs-csi-controller-sa -n kube-system
Implementation Patterns
Static Provisioning
Use existing EFS file systems with pre-defined configurations. Best for:
- Production environments with established storage policies
- When you need full control over EFS settings
- Cost optimization through resource reuse
Dynamic Provisioning
Automatically create EFS access points on-demand. Ideal for:
- Development and testing environments
- Applications requiring isolated storage paths
- Simplified storage management
Note: Ensure that the security group associated with your EFS file system allows inbound traffic on port
2049(NFS). This is required for proper communication between your EKS nodes and the EFS file system.
Real-World Examples
Example 1: Static Provisioning for Production Workloads
This approach uses an existing EFS file system, providing maximum control and cost efficiency.
Step 1: Create the Storage Class
# storageclass-static.yaml
apiVersion: storage.k8s.io/v1
kind: StorageClass
metadata:
  name: efs-static-sc
provisioner: efs.csi.aws.com
parameters:
  provisioningMode: efs-ap
reclaimPolicy: Retain
volumeBindingMode: Immediate
Step 2: Define the Persistent Volume
# pv-static.yaml
apiVersion: v1
kind: PersistentVolume
metadata:
  name: efs-static-pv
  labels:
    app: web-server
spec:
  capacity:
    storage: 10Gi
  volumeMode: Filesystem
  accessModes:
    - ReadWriteMany
  persistentVolumeReclaimPolicy: Retain
  storageClassName: efs-static-sc
  csi:
    driver: efs.csi.aws.com
    volumeHandle: fs-0abcd1234efgh5678  # Replace with your EFS ID
    volumeAttributes:
      encryptInTransit: "true"
Step 3: Create the Persistent Volume Claim
# pvc-static.yaml
apiVersion: v1
kind: PersistentVolumeClaim
metadata:
  name: efs-static-claim
  labels:
    app: web-server
spec:
  accessModes:
    - ReadWriteMany
  storageClassName: efs-static-sc
  resources:
    requests:
      storage: 10Gi
  selector:
    matchLabels:
      app: web-server
Step 4: Deploy the Application
# deployment-static.yaml
apiVersion: apps/v1
kind: Deployment
metadata:
  name: web-server
spec:
  replicas: 3
  selector:
    matchLabels:
      app: web-server
  template:
    metadata:
      labels:
        app: web-server
    spec:
      containers:
      - name: nginx
        image: nginx:1.21
        ports:
        - containerPort: 80
        volumeMounts:
        - name: shared-storage
          mountPath: /usr/share/nginx/html
        - name: logs
          mountPath: /var/log/nginx
      volumes:
      - name: shared-storage
        persistentVolumeClaim:
          claimName: efs-static-claim
      - name: logs
        persistentVolumeClaim:
          claimName: efs-static-claim
Deployment Commands:
# Get your EFS file system ID
aws efs describe-file-systems --query "FileSystems[*].[FileSystemId,Name]" --output table

# Apply configurations in order
kubectl apply -f storageclass-static.yaml
kubectl apply -f pv-static.yaml
kubectl apply -f pvc-static.yaml

# Wait for PVC to bind
kubectl get pvc efs-static-claim --watch

# Deploy the application
kubectl apply -f deployment-static.yaml

# Verify deployment
kubectl get pods,pvc,pv
kubectl exec -it deployment/web-server -- df -h /usr/share/nginx/html
Example 2: Dynamic Provisioning for Development
Dynamic provisioning automatically creates EFS access points, perfect for isolated development environments.
Step 1: Create Dynamic Storage Class
# storageclass-dynamic.yaml
kind: StorageClass
apiVersion: storage.k8s.io/v1
metadata:
  name: efs-dynamic-sc
provisioner: efs.csi.aws.com
parameters:
  provisioningMode: efs-ap
  fileSystemId: fs-0abcd1234efgh5678  # Replace with your EFS ID
  directoryPerms: "755"
  gidRangeStart: "1000"
  gidRangeEnd: "2000"
  basePath: "/dynamic"
  subPathPattern: "${.PVC.namespace}/${.PVC.name}"
  ensureUniqueDirectory: "true"
  reuseAccessPoint: "false"
allowVolumeExpansion: true
volumeBindingMode: Immediate
Step 2: Create Application with Dynamic PVC
# app-dynamic.yaml
apiVersion: v1
kind: PersistentVolumeClaim
metadata:
  name: dev-app-storage
  namespace: development
spec:
  accessModes:
    - ReadWriteMany
  storageClassName: efs-dynamic-sc
  resources:
    requests:
      storage: 5Gi
---
apiVersion: apps/v1
kind: Deployment
metadata:
  name: dev-application
  namespace: development
spec:
  replicas: 2
  selector:
    matchLabels:
      app: dev-app
  template:
    metadata:
      labels:
        app: dev-app
    spec:
      containers:
      - name: app
        image: alpine:latest
        command:
        - sh
        - -c
        - |
          while true; do
            echo "$(date): Processing data..." >> /data/app.log
            echo "Node: $HOSTNAME" >> /data/nodes.txt
            sleep 30
          done
        volumeMounts:
        - name: app-data
          mountPath: /data
        env:
        - name: HOSTNAME
          valueFrom:
            fieldRef:
              fieldPath: spec.nodeName
      volumes:
      - name: app-data
        persistentVolumeClaim:
          claimName: dev-app-storage
Deployment and Validation:
# Create namespace
kubectl create namespace development

# Deploy dynamic storage
kubectl apply -f storageclass-dynamic.yaml
kubectl apply -f app-dynamic.yaml

# Monitor provisioning
kubectl get pvc -n development --watch

# Validate cross-pod data sharing
kubectl exec -n development deployment/dev-application -- cat /data/nodes.txt
kubectl logs -n development deployment/dev-application
Example 3: Multi-Application Shared Storage
Demonstrate how multiple applications can share the same EFS volume with different access patterns.
Shared Storage Configuration:
# shared-storage-setup.yaml
apiVersion: storage.k8s.io/v1
kind: StorageClass
metadata:
  name: efs-shared-sc
provisioner: efs.csi.aws.com
---
apiVersion: v1
kind: PersistentVolume
metadata:
  name: shared-efs-pv
spec:
  capacity:
    storage: 50Gi
  volumeMode: Filesystem
  accessModes:
    - ReadWriteMany
  persistentVolumeReclaimPolicy: Retain
  storageClassName: efs-shared-sc
  csi:
    driver: efs.csi.aws.com
    volumeHandle: fs-0abcd1234efgh5678
---
apiVersion: v1
kind: PersistentVolumeClaim
metadata:
  name: shared-storage-claim
spec:
  accessModes:
    - ReadWriteMany
  storageClassName: efs-shared-sc
  resources:
    requests:
      storage: 50Gi
Data Producer Application:
# data-producer.yaml
apiVersion: apps/v1
kind: Deployment
metadata:
  name: data-producer
spec:
  replicas: 1
  selector:
    matchLabels:
      app: producer
  template:
    metadata:
      labels:
        app: producer
    spec:
      containers:
      - name: producer
        image: alpine:latest
        command:
        - sh
        - -c
        - |
          mkdir -p /shared/data /shared/logs
          while true; do
            timestamp=$(date -Iseconds)
            echo "{\"timestamp\":\"$timestamp\",\"data\":\"sample-$(shuf -i 1-1000 -n 1)\"}" > /shared/data/data-$timestamp.json
            echo "$timestamp: Generated data file" >> /shared/logs/producer.log
            sleep 10
          done
        volumeMounts:
        - name: shared-volume
          mountPath: /shared
      volumes:
      - name: shared-volume
        persistentVolumeClaim:
          claimName: shared-storage-claim
Data Consumer Application:
# data-consumer.yaml
apiVersion: apps/v1
kind: Deployment
metadata:
  name: data-consumer
spec:
  replicas: 2
  selector:
    matchLabels:
      app: consumer
  template:
    metadata:
      labels:
        app: consumer
    spec:
      containers:
      - name: consumer
        image: alpine:latest
        command:
        - sh
        - -c
        - |
          while true; do
            if [ -d "/shared/data" ]; then
              file_count=$(ls /shared/data/*.json 2>/dev/null | wc -l)
              echo "$(date): Found $file_count data files" >> /shared/logs/consumer-$HOSTNAME.log
            fi
            sleep 15
          done
        volumeMounts:
        - name: shared-volume
          mountPath: /shared
          readOnly: true
        env:
        - name: HOSTNAME
          valueFrom:
            fieldRef:
              fieldPath: metadata.name
      volumes:
      - name: shared-volume
        persistentVolumeClaim:
          claimName: shared-storage-claim
Advanced Configurations
Encryption in Transit
Enable encryption for sensitive data:
apiVersion: v1
kind: PersistentVolume
metadata:
  name: encrypted-efs-pv
spec:
  capacity:
    storage: 20Gi
  accessModes:
    - ReadWriteMany
  csi:
    driver: efs.csi.aws.com
    volumeHandle: fs-0abcd1234efgh5678
    volumeAttributes:
      encryptInTransit: "true"
      # Optional: Specify mount target IP for direct IP mounting
      # mounttargetip: "10.0.1.100"
Performance Mode Configuration
Configure EFS for different performance requirements:
# For high-performance workloads
kind: StorageClass
apiVersion: storage.k8s.io/v1
metadata:
  name: efs-performance-sc
provisioner: efs.csi.aws.com
parameters:
  provisioningMode: efs-ap
  fileSystemId: fs-0abcd1234efgh5678
  performanceMode: maxIO  # or generalPurpose
  throughputMode: provisioned
  provisionedThroughputInMibps: "1000"
Ephemeral Volumes
For temporary storage that doesn't need persistence:
apiVersion: v1
kind: Pod
metadata:
  name: ephemeral-storage-pod
spec:
  containers:
  - name: app
    image: alpine:latest
    command: ["/bin/sh", "-c", "while true; do date >> /tmp/timestamps.txt; sleep 60; done"]
    volumeMounts:
    - name: ephemeral-efs
      mountPath: /tmp
  volumes:
  - name: ephemeral-efs
    ephemeral:
      volumeClaimTemplate:
        spec:
          accessModes: ["ReadWriteMany"]
          storageClassName: efs-dynamic-sc
          resources:
            requests:
              storage: 1Gi
Best Practices
Security Best Practices
- Enable Encryption: Always use encryption in transit and at rest
- IAM Least Privilege: Grant minimal required permissions
- Network Security: Use VPC security groups to control EFS access
- Access Points: Use EFS access points for application isolation
Performance Optimization
-
Choose Appropriate Performance Mode:
- General Purpose: Default, lowest latency
- Max I/O: Higher aggregate throughput and IOPS
-
Throughput Mode Selection:
- Bursting: Default, scales with storage size
- Provisioned: Consistent performance regardless of size
-
Regional Considerations:
- Deploy EFS in the same region as your EKS cluster
- Use mount targets in each AZ for optimal performance
Cost Optimization
- Storage Classes: Use EFS Intelligent-Tiering for automatic cost optimization
- Lifecycle Policies: Configure automatic transition to cheaper storage classes
- Access Point Quotas: Monitor and manage access point usage
- Right-sizing: Start with smaller storage requests and expand as needed
Monitoring and Observability
# Example ServiceMonitor for Prometheus
apiVersion: monitoring.coreos.com/v1
kind: ServiceMonitor
metadata:
  name: efs-csi-metrics
spec:
  selector:
    matchLabels:
      app: efs-csi-controller
  endpoints:
  - port: metrics
    path: /metrics
Troubleshooting
Common Issues and Solutions
Issue 1: PVC Stuck in Pending State
# Check events
kubectl describe pvc your-pvc-name

# Verify CSI driver pods
kubectl get pods -n kube-system -l app=efs-csi-controller

# Check CSI driver logs
kubectl logs -n kube-system deployment/efs-csi-controller
Issue 2: Mount Failures
# Check node logs
kubectl logs -n kube-system daemonset/efs-csi-node

# Verify security group rules
aws ec2 describe-security-groups --group-ids sg-xxxxxxxxx

# Test EFS connectivity from worker node
sudo mount -t efs fs-0abcd1234efgh5678:/ /mnt/efs
Issue 3: Performance Issues
# Monitor EFS metrics
aws cloudwatch get-metric-statistics \
    --namespace AWS/EFS \
    --metric-name PercentIOLimit \
    --dimensions Name=FileSystemId,Value=fs-0abcd1234efgh5678 \
    --statistics Average \
    --start-time 2024-01-01T00:00:00Z \
    --end-time 2024-01-01T01:00:00Z \
    --period 300
Debugging Commands
# List all EFS-related resources
kubectl get pv,pvc,sc | grep efs

# Check CSI driver version
kubectl get csidriver efs.csi.aws.com -o yaml

# Examine CSI node information
kubectl get csinodes

# Monitor EFS CSI controller logs in real-time
kubectl logs -n kube-system deployment/efs-csi-controller -f
Cleanup Procedures
Safe Resource Cleanup
# 1. Delete applications first
kubectl delete deployment your-app-name

# 2. Delete PVCs (this may delete dynamically provisioned volumes)
kubectl delete pvc your-pvc-name

# 3. Delete PVs (for static provisioning)
kubectl delete pv your-pv-name

# 4. Delete StorageClasses (if no longer needed)
kubectl delete sc your-storage-class-name

# 5. Verify cleanup
kubectl get pv,pvc,sc
Automated Cleanup Script
#!/bin/bash
# cleanup-efs-resources.sh

NAMESPACE=${1:-default}

echo "Cleaning up EFS resources in namespace: $NAMESPACE"

# Delete all pods using EFS PVCs
kubectl delete pods -n $NAMESPACE --all --grace-period=30

# Delete PVCs
kubectl delete pvc -n $NAMESPACE --all

# Wait for PVC deletion
kubectl wait --for=delete pvc --all -n $NAMESPACE --timeout=300s

# Clean up PVs if they exist
kubectl delete pv -l provisioner=efs.csi.aws.com

echo "Cleanup completed!"
Conclusion
Amazon EFS integration with EKS provides a powerful solution for applications requiring shared, persistent storage. Key takeaways:
- Choose the Right Approach: Static provisioning for production, dynamic for development
- Security First: Always enable encryption and follow IAM best practices
- Monitor Performance: Use CloudWatch metrics to optimize throughput and costs
- Plan for Scale: Consider access point quotas and regional deployment strategies
By following this guide, you'll have a robust, scalable storage solution that grows with your Kubernetes applications while maintaining security and performance standards.