CSI Ephemeral Volumes: A Deep Dive into Kubernetes CSI with the HostPath Driver
Use the manifest templates to create your own Kubernetes resources which can be used in the examples below.
The Container Storage Interface (CSI) is the standard for exposing block and file storage systems to containerized workloads on Kubernetes. But diving into CSI with cloud-specific drivers can be complex. What if you just want to understand the mechanics?
This driver is just a demo implementation and is used for CI testing. This has many fake implementations and other non-standard best practices, and should not be used as an example of how to write a real driver.
Enter the CSI HostPath Driver. It's the perfect tool for learning, developing, and testing Kubernetes storage concepts in a simple, local environment. This hands-on guide will walk you through everything you need to know.
What is the CSI HostPath Driver? 🚗
The CSI HostPath driver is a basic implementation of the CSI specification. Instead of provisioning storage on a cloud platform like AWS or GCP, it creates directories on the Kubernetes worker node's own filesystem (the "host path").
Its primary purpose is for development and testing. Because the data is tied to a single node, you should never use it for production workloads. If the node goes down, the data is gone! However, it's an invaluable tool for understanding how Kubernetes interacts with a CSI driver for volume provisioning, mounting, and management.
Installation and Verification
Let's get our hands dirty and install the driver in our cluster.
Step 1: Install the Driver
The recommended way to install the driver is by applying a manifest directly from the official Kubernetes CSI GitHub repository. This script deploys all the necessary components, including the CSIDriver object, a Statefulset for the driver pods, and the required RBAC permissions.
./manifests/csidriver-install/deploy.sh
./deploy.sh
This will create the necessary CSIDriver object, the Statefulset for the driver pods, and the required RBAC permissions.
Step 2: Verify the Installation
After a minute, check that the driver's pods are running. They are created in the current namespace.
kubectl get pods -l app.kubernetes.io/name=csi-hostpathplugin -o wide
You should see pods running on your worker nodes. Let's pick one to be our target for the rest of this tutorial.
> kubectl get pods -l app.kubernetes.io/name=csi-hostpathplugin -o wide
NAME                   READY   STATUS    RESTARTS   AGE   IP            NODE                         NOMINATED NODE   READINESS GATES
csi-hostpathplugin-0   4/4     Running   0          49m   10.0.113.53   ip-10-0-72-66.ec2.internal   <none>           <none>
Great! Our driver is running on node ip-10-0-72-66.ec2.internal.
Step 3: Label the Target Node
To ensure our test application lands on the node where we know the driver is running, we'll add a label to it. This makes scheduling predictable.
kubectl label node ip-10-0-72-66.ec2.internal csidriver=hostpathcsi
Testing with an Ephemeral Volume
An ephemeral volume is temporary storage that lives and dies with the Pod. It's a perfect first test for our driver.
Step 1: Deploy the Test Pod
Create a file named pod-ephemeral.yaml with the following content. Notice two key things:
nodeSelector: This tells Kubernetes to only schedule this Pod on the node we just labeled.volumes.csi: This defines an inline ephemeral volume that uses ourhostpath.csi.k8s.iodriver.
kind: Pod
apiVersion: v1
metadata:
  name: my-csi-app
spec:
  nodeSelector:
    csidriver: hostpathcsi
  containers:
    - name: my-frontend
      image: busybox:1.28
      volumeMounts:
      - mountPath: "/data"
        name: my-csi-inline-vol
      command: [ "sleep", "1000000" ]
  volumes:
    - name: my-csi-inline-vol
      csi:
        driver: hostpath.csi.k8s.io
Now, deploy it:
kubectl apply -f pod-ephemeral.yaml
Step 2: Verify the Mount Inside the Pod
Let's get a shell inside our running container to confirm that the volume was mounted successfully.
# Get a shell inside the running container
kubectl exec -it my-csi-app -- /bin/sh

# Inside the container, check the mounts using df (disk free)
/ # df -h
Filesystem                Size      Used Available Use% Mounted on
...
/dev/sda1                 8.0G      1.2G      6.8G  15% /data  <-- Your mounted volume!
...

# Write a file to the CSI volume
/ # echo "CSI ephemeral volume works!" > /data/test.txt

# Read the file back
/ # cat /data/test.txt
CSI ephemeral volume works!

# Exit the container
/ # exit
Success! The application can write to and read from the volume provided by our CSI driver.
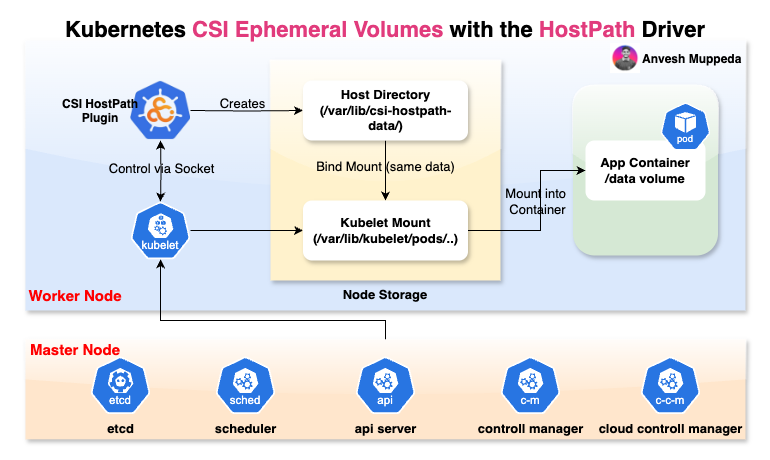
Lifting the Hood: How the Mount Works 🕵️♀️
Now for the most interesting part. Where does that /data/test.txt file actually live on the worker node? Let's SSH into our target node (ip-10-0-236-77.ec2.internal) and find out.
# On the worker node
find / -name "test.txt"
You will get two results, which reveals the magic of how CSI works:
/var/lib/kubelet/pods/7b8714dc-daec-43a5-b3bc-d6aa994b8a4c/volumes/kubernetes.io~csi/my-csi-inline-vol/mount/test.txt
/var/lib/csi-hostpath-data/csi-c2c9ee2c77a1163327bd95c2632bcbdae63069a3483204f8c385b2c5773530f1/test.txt
This is not a mistake, and the file is not duplicated. Here’s what each path means:
1. The Volume Source Directory (The "Real Folder")
/var/lib/csi-hostpath-data/csi-c2c9ee.../test.txt
This path is managed by the CSI HostPath driver. When Kubelet requested a volume, the driver created this unique directory to serve as the physical storage location. This is where the data actually lives on the disk.
2. The Pod's Mount Point (The "Shortcut")
/var/lib/kubelet/pods/7b8714dc.../mount/test.txt
This path is managed by the Kubelet. For every Pod, Kubelet creates a dedicated directory structure. It then tells the CSI driver to make the volume available at this specific mount path.
Kubelet connects these two locations using a bind mount, a Linux feature that makes a directory visible at a second location without copying any data. This means both paths point to the exact same bytes on the disk, which is why a 2GB file will only consume 2GB of total space, not 4GB.
Going Further: Persistent Volumes
Ephemeral volumes are great, but the real power of CSI comes from managing persistent storage. The HostPath driver can do this too!
-
Create a StorageClass: This tells Kubernetes how to provision new volumes using our driver.
# sc-hostpath.yaml
apiVersion: storage.k8s.io/v1
kind: StorageClass
metadata:
  name: csi-hostpath-sc
provisioner: hostpath.csi.k8s.io
reclaimPolicy: Delete
volumeBindingMode: WaitForFirstConsumer -
Create a PersistentVolumeClaim (PVC): The application requests storage by creating a PVC.
# pvc-hostpath.yaml
apiVersion: v1
kind: PersistentVolumeClaim
metadata:
  name: hostpath-pvc
spec:
  accessModes:
  - ReadWriteOnce
  resources:
    requests:
      storage: 1Gi
storageClassName: csi-hostpath-sc -
Deploy a Pod with the PVC: The Pod now references the PVC instead of defining an inline volume.
# pod-persistent.yaml
kind: Pod
apiVersion: v1
metadata:
  name: my-csi-app-persistent
spec:
  nodeSelector:
    csidriver: hostpathcsi
  containers:
    - name: my-frontend
      image: busybox:1.28
      volumeMounts:
      - mountPath: "/data"
        name: my-csi-volume
      command: [ "sleep", "1000000" ]
  volumes:
    - name: my-csi-volume
      persistentVolumeClaim:
        claimName: hostpath-pvc
Apply these files, and you'll have a pod with persistent storage, all managed by the simple HostPath driver!
Cleanup
To remove everything you've created, delete the resources in reverse order:
./manifests/csidriver-install/destroy.sh
kubectl delete pod my-csi-app
kubectl delete pod my-csi-app-persistent
kubectl delete pvc hostpath-pvc
kubectl delete sc csi-hostpath-sc
kubectl label node ip-10-0-236-77.ec2.internal csidriver-
./manifests/csidriver-install/destroy.sh
Conclusion
The CSI HostPath driver is a fantastic educational tool. By using it, we've demystified the entire lifecycle of Kubernetes storage—from installing a driver and provisioning ephemeral volumes to understanding bind mounts and managing persistent claims. While you'd never use it for your critical applications, the knowledge you gain from it is invaluable for mastering storage in any Kubernetes environment.