kubeadm
Step-by-Step Guide: Setting Up a Kubernetes Cluster on AWS EC2 Using kubeadm
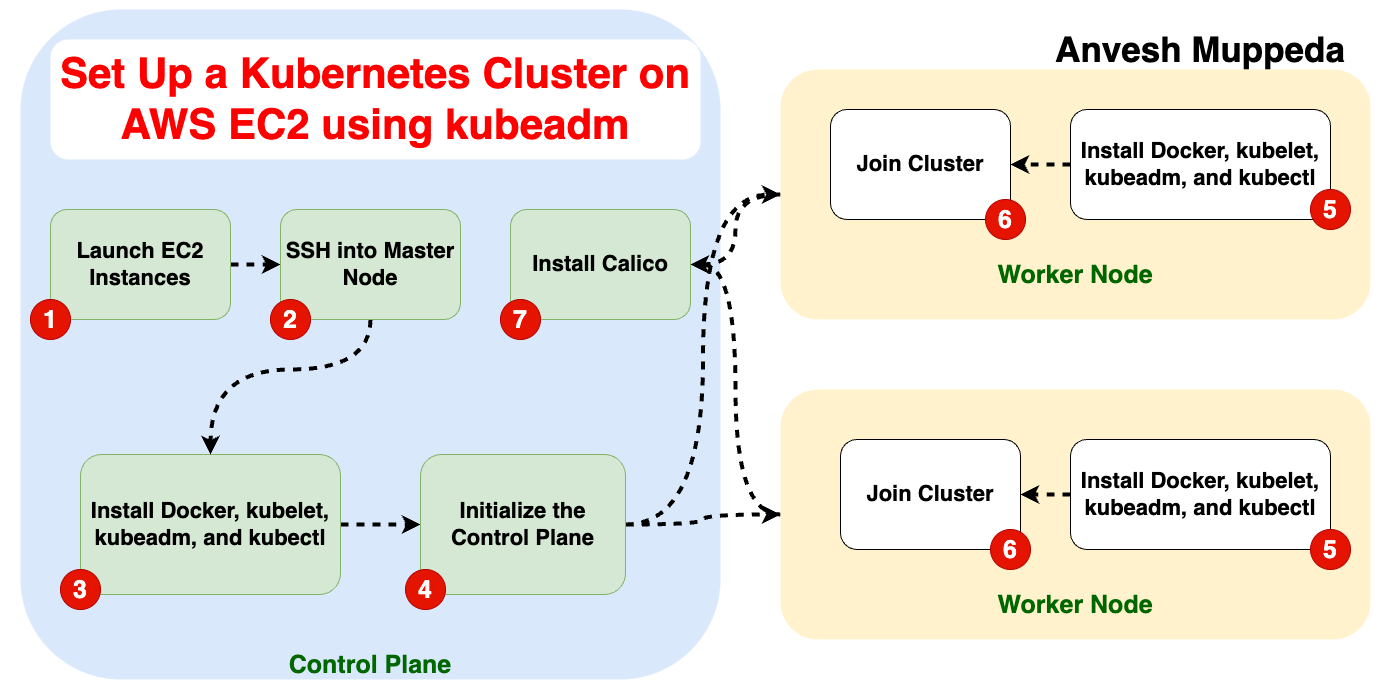
This guide demonstrates how to set up a Kubernetes cluster with one control plane and one worker node on AWS EC2 instances. It covers EC2 instance configuration, Kubernetes installation, and deploying a sample application.
Introduction
Kubernetes has become the backbone of modern container orchestration, making it essential for developers and system administrators alike. Setting up a Kubernetes cluster can seem daunting, but with tools like kubeadm, it's more straightforward than ever.
In this guide, we'll walk you through creating a Kubernetes cluster on AWS EC2 using Amazon Linux 2, kubeadm, Docker, and Calico. We'll also tackle common errors and debugging tips to ensure a smooth setup.
1. Launch EC2 Instances
-
Launch Two EC2 Instances:
- Control Plane Node: Manages the Kubernetes cluster.
- Worker Node: Hosts application workloads.
-
Create Security Groups with the Following Rules:
Control Plane Security Group
| Protocol | Direction | Port Range | Purpose |
|---|---|---|---|
| TCP | Inbound | 6443 | Kubernetes API Server |
| TCP | Inbound | 2379-2380 | etcd client API |
| TCP | Inbound | 10250 | Kubelet API |
| TCP | Inbound | 10259 | kube-scheduler |
| TCP | Inbound | 10257 | kube-controller-manager |
Worker Node Security Group
| Protocol | Direction | Port Range | Purpose |
|---|---|---|---|
| TCP | Inbound | 10250 | Kubelet API |
| TCP | Inbound | 10256 | kube-proxy |
| TCP | Inbound | 30000-32767 | NodePort Services |
2. Set Up the Control Plane Node
-
SSH Into the Instance:
ssh -i k8s-key.pem ec2-user@<control-plane-public-ip>
sudo su -
Update the System:
yum update -y -
Install Docker:
yum install -y docker
systemctl enable --now docker -
Disable SELinux:
setenforce 0
sed -i 's/^SELINUX=enforcing$/SELINUX=permissive/' /etc/selinux/config -
Add Kubernetes Repository:
cat <<EOF | tee /etc/yum.repos.d/kubernetes.repo
[kubernetes]
name=Kubernetes
baseurl=https://pkgs.k8s.io/core:/stable:/v1.29/rpm/
enabled=1
gpgcheck=1
gpgkey=https://pkgs.k8s.io/core:/stable:/v1.29/rpm/repodata/repomd.xml.key
exclude=kubelet kubeadm kubectl cri-tools kubernetes-cni
EOF -
Install Kubernetes Components:
yum install -y kubelet kubeadm kubectl --disableexcludes=kubernetes
systemctl enable --now kubelet -
Initialize the Control Plane:
kubeadm init --apiserver-advertise-address=<private-ip-of-control-plane> --pod-network-cidr=192.168.0.0/16Save the output of this command, which includes a
kubeadm joincommand for adding worker nodes. -
Configure kubectl for the Admin User:
mkdir -p $HOME/.kube
cp -i /etc/kubernetes/admin.conf $HOME/.kube/config
chown $(id -u):$(id -g) $HOME/.kube/config -
Verify the Control Plane Node:
kubectl get nodesThe control plane node will be in a
NotReadystate until the network plugin is installed.
3. Set Up the Worker Node
-
SSH Into the Worker Node:
ssh -i k8s-key.pem ec2-user@<worker-node-public-ip>
sudo su -
Update the System:
yum update -y -
Install Docker:
yum install -y docker
systemctl enable --now docker -
Disable SELinux:
setenforce 0
sed -i 's/^SELINUX=enforcing$/SELINUX=permissive/' /etc/selinux/config -
Add Kubernetes Repository: Repeat the same steps as for the control plane node to add the Kubernetes repository.
-
Install Kubernetes Components:
yum install -y kubelet kubeadm kubectl --disableexcludes=kubernetes
systemctl enable --now kubelet -
Join the Worker Node to the Cluster: Use the
kubeadm joincommand from the control plane initialization step:kubeadm join <control-plane-private-ip>:6443 --token <token> --discovery-token-ca-cert-hash sha256:<hash> -
Verify the Worker Node is Joined: SSH back into the control plane node and run:
kubectl get nodesThe worker node will appear but may still show as
NotReady.
4. Install a Network Plugin
-
Download and Apply Calico:
curl -O https://raw.githubusercontent.com/projectcalico/calico/v3.29.0/manifests/calico.yaml
kubectl apply -f calico.yaml -
Verify the Nodes: Wait a few seconds and check the node statuses:
kubectl get nodesBoth nodes should now show
Ready.
5. Deploy a Sample Application
-
Create an Nginx Pod:
kubectl create deployment nginx --image=nginx
kubectl expose deployment nginx --type=NodePort --port=80 -
Access the Application: Retrieve the NodePort of the service:
kubectl get svc nginxAccess the application using the control plane's public IP and the NodePort:
http://<control-plane-public-ip>:<NodePort>
Conclusion
By following this guide, you have successfully set up a Kubernetes cluster on AWS EC2 instances. You can now use the cluster to deploy and manage containerized applications. For further information, refer to the official Kubernetes documentation.
References
- Install kubeadm
- Create a cluster with kubeadm
- Install Docker as a container runtime
- Install Calico for networking
Debug Guide: Resolving Common Kubernetes Installation Issues on AWS EC2
When setting up Kubernetes on AWS EC2, you may encounter several challenges. Below is a guide to troubleshooting and resolving common issues, using your experience as an example.
1. Issue: Dependency Resolution Error During Kubernetes Installation
Symptom
While installing Kubernetes components (kubelet, kubeadm, kubectl), the following error occurs:
Error: Package: kubeadm-1.31.2-150500.1.1.x86_64 (kubernetes)
           Requires: cri-tools >= 1.30.0
Root Cause
The cri-tools package version in the Amazon Linux 2 repository is outdated or incompatible with the Kubernetes version you are installing.
Resolution Steps
-
Check Available Versions of cri-tools:
yum list available cri-toolsIdentify a version of
cri-toolsthat satisfies the dependency. -
Install the Compatible Version:
yum install -y cri-toolsIf this fails, you may install an alternative compatible runtime like CRI-O:
yum install -y cri-o cri-tools -
Retry Installing Kubernetes: After resolving the dependency, rerun:
yum install -y kubelet kubeadm kubectl --disableexcludes=kubernetes -
Verification: Ensure all required components are installed:
kubeadm version
kubectl version --client
kubelet --version
2. Issue: Nodes Show NotReady State
Symptom
After joining the cluster, the nodes show NotReady when running:
kubectl get nodes
Root Cause
This usually occurs due to a missing or misconfigured network plugin (CNI).
Resolution Steps
-
Install a Network Plugin: Install Calico as an example:
curl -O https://raw.githubusercontent.com/projectcalico/calico/v3.29.0/manifests/calico.yaml
kubectl apply -f calico.yaml -
Verify Node Status: Check again after a few minutes:
kubectl get nodes -
Check Pod Logs for Issues:
kubectl logs -n kube-system <pod-name>
3. Issue: kubeadm Join Command Fails
Symptom
Running kubeadm join on the worker node results in an error such as:
[ERROR] unable to connect to the API server
Root Cause
- Network connectivity between the worker and control plane nodes is blocked.
- The token or CA certificate hash is incorrect.
Resolution Steps
-
Verify Control Plane Reachability: Ensure the worker node can reach the control plane:
telnet <control-plane-private-ip> 6443 -
Ensure Security Group Configuration: Update the security group for the control plane to allow traffic on port
6443from the worker node. -
Regenerate the Token if Needed: If the token has expired, generate a new one on the control plane:
kubeadm token create --print-join-command -
Retry the Join Command: Run the updated
kubeadm joincommand on the worker node.
4. Issue: Docker Installation Issues
Symptom
Docker fails to start, or commands like docker ps do not work.
Root Cause
Docker may not be properly installed, or the docker service is not running.
Resolution Steps
-
Reinstall Docker:
yum remove -y docker
yum install -y docker -
Start and Enable Docker:
systemctl start docker
systemctl enable docker -
Verify Installation:
docker --version -
Test Docker: Run a test container:
docker run hello-world
5. Issue: kubelet Service Fails to Start
Symptom
The kubelet service fails with an error:
Failed to start kubelet: Misconfiguration
Root Cause
- Incomplete configuration in
/etc/kubernetes/kubelet.conf. - Missing network plugin.
Resolution Steps
-
Check Logs:
journalctl -xeu kubelet -
Restart kubelet: After fixing the configuration:
systemctl restart kubelet -
Verify Status:
systemctl status kubelet
6. General Debugging Tools
-
Check Kubernetes Logs:
kubectl logs -n kube-system <pod-name> -
Verify Pod and Service States:
kubectl get pods -A
kubectl get svc -A -
Inspect Events for Errors:
kubectl describe nodes
kubectl describe pods -n kube-system -
Use cURL to Test API Server: Ensure the API server is reachable:
curl -k https://<control-plane-private-ip>:6443/version
Conclusion
This debug guide provides solutions to common Kubernetes installation issues, such as dependency errors, node readiness problems, and network connectivity. Always refer to the Kubernetes documentation for more details: